Continuous Integration#
For Continuous Integration (CI) of your set-top box or app’s software, you’ll want to configure your CI server (such as Jenkins or Bamboo) with a job that gets triggered whenever your developers change the source-code for your set-top box or app. The job should do the following steps:
Build your software.
Deploy it to the device-under-test.
Start the tests using Stb-tester’s REST API /api/v2/run_tests
Poll the status of the test-job until it has finished, using /api/v2/jobs/(job_uid)/await_completion
Record the test results in JUnit XML format using /api/v2/results.xml?filter=job:(job_uid)
You will need to implement steps 1 & 2 yourself. For steps 3-5, we provide a Python script called stbt_rig.py. Read on for instructions.
Set up your source-code repository#
Download stbt_rig.py into the repository that you will be testing in CI (that is, the source code of your app or your set-top box). You can put it anywhere, for example in a
tests/subdirectory. Make it executable, and commit it.Create a file named
.stbt.confin the root of that same repository, with the following contents (substituting COMPANYNAME with the name of your Stb-tester Portal), and commit it:[test_pack] portal_url = https://COMPANYNAME.stb-tester.com
Jenkins#
Set up your Jenkins server#
Install the following Jenkins plugins:
Credentials Binding Plugin
JUnit Plugin
Install the requests Python package (
pip install requestsorapt install python-requests).
Set up your Jenkins job#
We assume that you have already created a Jenkins job (or several jobs in a pipeline) that monitors your source-code repository for new commits, makes a build, runs unit tests, and deploys the build to your device-under-test. The next step in the pipeline is to run Stb-tester tests against that device:
Go to the Stb-tester Portal in your web browser and create an access token.
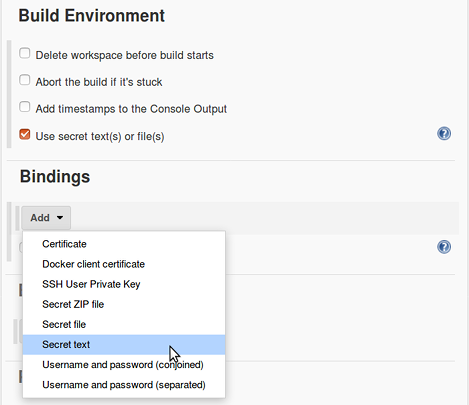
Edit the configuration of your Jenkins job. In the Build Environment section, tick Use secret text(s) or file(s). Click Add and select Secret text.
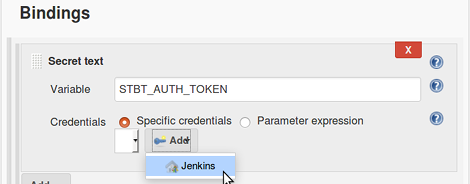
For the Variable name type STBT_AUTH_TOKEN. For the Credentials select Specific credentials and click Add.
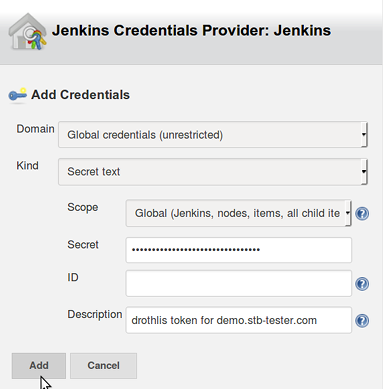
In the Add Credentials dialog, enter the following information:
Domain: Global credentials
Kind: Secret text
Scope: Global
Secret: Paste the access token from step 1
Description: Enter something that you (and other Jenkins users) will be able to recognise. It’s a good idea to include your GitHub username (as it’s associated with the access token you created in the Stb-tester Portal) and the URL of the portal.
In the Build section, add a build step of type Execute shell. Paste in the following command:
./stbt_rig.py \
    -v --node-id=stb-tester-abcdef123456 run \
    tests/roku.py::test_entering_the_settings_menu \
    tests/roku.py::test_launching_iplayer_content
Change the Node ID to the Stb-tester Node where you want to run the tests (that is, the Stb-tester HDMI or Stb-tester Camera node that is connected to the device-under-test where you deployed the build earlier in your CI pipeline). The Node ID is labelled on the physical Stb-tester Node, and it is also shown in the Stb-tester Portal.
Change the list of tests to the tests that you actually want to run.
If you installed
stbt_rig.pyin a subfolder of your source-code repository, make sure you specify the same path here.For more details on the parameters to
stbt_rig.py, run./stbt_rig.py --helpand./stbt_rig.py run --helpon your PC.In the Post-build Actions section, add the action Publish JUnit test result report. For the Test report XMLs type stbt-results.xml
Save your changes to the Jenkins job, and run a build to test it!
Bamboo#
Set up your Bamboo server#
Install the requests Python package on each of your Bamboo agents (pip
install requests or apt install python-requests).
If you are using Docker containers for your Bamboo jobs, install the above in the appropriate Docker image instead.
Set up your Bamboo job#
We assume that you have already created a Bamboo “Plan” that monitors your source-code repository for new commits, makes a build, runs unit tests, and deploys the build to your device-under-test. The next stage in the plan needs to run your Stb-tester tests against that device.
Go to the Stb-tester Portal in your web browser and create an access token.
In your Plan Configuration go to Variables. Add a variable with the name STBT_AUTH_PASSWORD. For the value, paste the access token from step 1.
In the Plan’s Job Configuration, add a Script Task. Enter the following configuration:
Interpreter: Shell
Script location: File
Script file: stbt_rig.py
Argument: -v –node-id=stb-tester-abcdef123456 run tests/roku.py::test_entering_the_settings_menu tests/roku.py::test_launching_iplayer_content
Change the Node ID to the Stb-tester Node where you want to run the tests (that is, the Stb-tester HDMI or Stb-tester Camera node that is connected to the device-under-test where you deployed the build earlier in your Bamboo plan). The Node ID is labelled on the physical Stb-tester Node, and it is also shown in the Stb-tester Portal.
Change the list of tests to the tests that you actually want to run.
For more details on the parameters to
stbt_rig.py, run./stbt_rig.py --helpand./stbt_rig.py run --helpon your PC.If you installed
stbt_rig.pyin a subfolder of your source-code repository, make sure you specify the same path in the Script file value.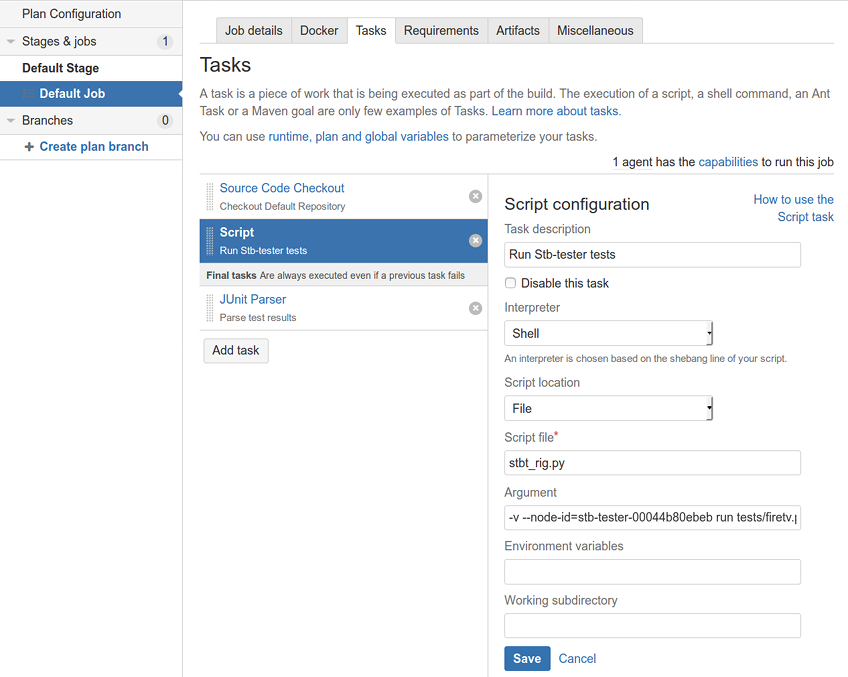
Add a JUnit Parser task and make it a Final task (so that it gets run even if the tests fail). Enter the following configuration:
Specify custom results directories: stbt-results.xml
Save your changes, and run a build to test it!
CI for your test-pack#
It’s also useful to set up Continuous Integration for each change made to your test-pack repository.
Instead of deploying a new build to the device-under-test each time, you’ll want a known stable build; and instead of using the master branch of the test-pack, you’ll be running the Stb-tester tests from the new commit of the test-pack.
Make sure that you use a different device than your normal CI! Otherwise you won’t know if a test failure is caused by changes to the tests or by changes to the device-under-test’s software.
Configuration |
CI for your app or set-top box |
CI for your test-pack |
|---|---|---|
Source-code repository being tested |
The source code of your app or your set-top box |
Stb-tester test-pack git repository |
Software on your device-under-test |
New build installed by your CI pipeline |
Stable build installed manually |
Test-pack branch to run |
./stbt_rig.py run \
  --test-pack-revision=master
|
./stbt_rig.py run \
  --test-pack-revision=$GIT_COMMIT
|