Measuring channel change time with Stb-tester
The above video demonstrates an automated test script that measures a set-top box’s channel change performance. By running the test repeatedly, you can gather hundreds of measurements while you’re at lunch, so that when you get back you can focus on analysing the data. Leave the tedious mechanical work to stb-tester, freeing up the human to do what humans do best!
Read on for more details and instructions aimed at test developers.
Summary
Add the testcase below to your test-pack, provide your own mask image and your own go_to_channel function, run the test in soak, and use this Jupyter notebook to generate a histogram of the results.
The test script
Here is the test script we saw in the video:
import json
import time

from stbt import is_screen_black, press, wait_until

from utils import go_to_channel


def test_channel_change():
    go_to_channel(120)
    press("KEY_CHANNELUP")
    start = time.time()
    assert wait_until(lambda: is_screen_black(mask="images/channel-change-mask.png"))
    assert wait_until(lambda: not is_screen_black(mask="images/channel-change-mask.png"))
    end = time.time()
    with open("timings.json", "w") as f:
        json.dump({"channel_change": end - start}, f)
The utils module (which defines go_to_channel) is another Python file in the test-pack, not shown here.
You may need to adapt some of the details to suit your set-top box’s UI, so let’s walk through it line by line.
Starting from a known state

The first step is to get the device-under-test into a known state: Watching live TV. This allows us to run the testcase as part of a larger test suite – for example we might want to run all our testcases in random order, so we won’t know what state our set-top box is in after the previous testcase.
go_to_channel(120)Here we’ve used a helper function go_to_channel, which we have defined elsewhere. The particular sequence of actions to close any possible apps, dialogs or menus, will depend on your set-top box’s UI.
If we want to gather many measurements by running this testcase repeatedly, we’ll want those measurements to be consistent. For example we don’t want some of the measurements to be from MHEG channels, which can take much longer to tune than a normal channel, and thus would obscure any outliers in the measurements for normal channels. That is why our testcase always starts from channel 120 and changes to 121. An alternative approach might be to measure several channel changes (of different channels), and log each measurement into a different “bucket” (SD, HD, MHEG, etc).
Identifying the end of the channel change
When to start the timer is easy: As soon as we’ve pressed the “channel up” button. How to detect that the new channel has tuned successfully, is slightly trickier: We want this testcase to work with real, production, broadcast signals, so we can’t look for a particular image because we don’t know what content will be playing on the new channel. (If we were using a canned feed with a known test pattern, then image matching could work well.)
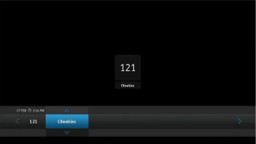
On our set-top box, as soon as we press “channel up” a channel patch appears in the centre of the screen displaying the target channel number:

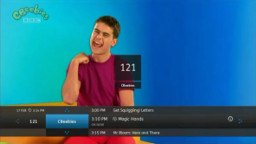
Then the screen goes black, but the channel patch remains, and shortly afterwards an “info bar” or “mini guide” appears:
Finally the new channel’s content appears:
Our testcase uses stbt.is_screen_black to detect when the screen is black, and when it is not:
is_screen_black(mask="images/channel-change-mask.png")is_screen_black takes an optional mask parameter that tells it which parts of the screen to ignore. The mask is a 1280x720 black-and-white image where black pixels represent the areas to ignore.
| frame | mask | is_screen_black(frame, mask) |
|---|---|---|
|
(None) | False |
|
 |
True |
|
|
False |
To create the mask take a screenshot from the Stb-tester web interface, open it in an image-editing program such as GIMP, and draw the black and white regions on top of it.
assert wait_until(lambda: is_screen_black(mask="images/channel-change-mask.png"))
assert wait_until(lambda: not is_screen_black(mask="images/channel-change-mask.png"))
is_screen_black() will grab a single frame from the device under test, so we need to call it many times in a loop, until it finds a black frame. stbt.wait_until is a helper function that takes another function, and calls that function repeatedly until it returns a “truthy” value, eventually timing out (the default timeout is 10 seconds).
So the two lines of code above wait for the screen to go black, then wait for it to not be black any more. In both cases, the assert ensures that the test will fail if wait_until timed out.
If you expect very slow reaction times from your set-top box, you may want to increase the timeout like this:
assert wait_until(lambda: is_screen_black(mask="images/channel-change-mask.png"),
                  timeout=30)
Detecting motion
After the new channel’s content appears, you might also want to check that the new content isn’t frozen. stbt.wait_for_motion checks that there is movement on the screen; it looks for differences between successive frames. It takes a mask parameter so that when the channel-patch disappears it isn’t counted as motion.
Be aware that using wait_for_motion to detect the end of a channel change can add false negatives, because sometimes broadcast television does show static images briefly, for example on news channels. This would make the measured time be longer than the actual time it took to change channel. It’s only worth pursuing this if you are facing a specific problem where your set-top box’s playback stutters immediately after a channel change.
Recording the data: Test artifacts
in the Stb-tester results interface
with open("timings.json", "w") as f:
    json.dump({"channel_change": end - start}, f)
Here we’ve chosen to log the data in JSON format to a file. The test script can create any files in the current working directory; those files will appear as artifacts of each test-run. You can access those artifacts using Stb-tester’s interactive results interface, or using the REST API.
An alternate approach is to print the data:
print "Channel change took:", (end - start)The output will show up in the stbt.log artifact.
We prefer the JSON approach; otherwise we’d have to write code to parse the
stbt.log to extract the information we want. print is still useful,
particularly for logging debug information to aid a human when replaying a
failed test.
Data analysis with Jupyter
Jupyter is a web application that allows you to share interactive documents (called “notebooks”) for data analysis with Python. Install Jupyter on your PC, then download our channel-change.ipynb notebook – consider committing it to your test-pack, perhaps in a directory called “notebooks”.

channel-change.ipynb
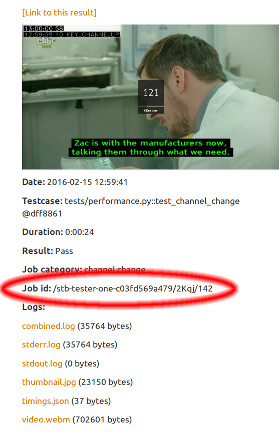
Run jupyter notebook and open the channel-change notebook. Change the value of job_id to match your test job, and change hostname to your stb-tester ONE’s hostname or IP address. Run the notebook, and you’ll get a nice histogram of your data! See the documentation for pyplot.hist if you want to tweak the histogram (for example to increase the number of bins).
“Test job” means all the test-runs from when you pressed “Run tests” until you pressed “Stop” (or until the job stopped on its own, if you selected “run once” from the soak-testing options). You can find the job id for any test-run from Stb-tester’s results interface: