Testing on-screen keyboards#
Stb-tester v32 added new APIs that make it much easier to navigate on-screen keyboards from your test scripts. In this tutorial we’ll model the behaviour of YouTube’s search keyboard on the Apple TV, and we’ll write a Page Object (a Python class) to navigate the keyboard from our test scripts.
Demo#
By the end of this tutorial we will have implemented a Page Object with an
enter_text method, so you can write a test script like this:
page = Search()
page.enter_text("Peppa Pig")
Watch it in action:
Modelling the keyboard#
First we will specify a Directed Graph that describes the behaviour of the keyboard under test. A “graph” (in the computer-science sense of the word) consists of “nodes” connected by “edges”. Each key on our keyboard will be a node in our graph, and the possible transitions from each key to its neighbours will be the edges:
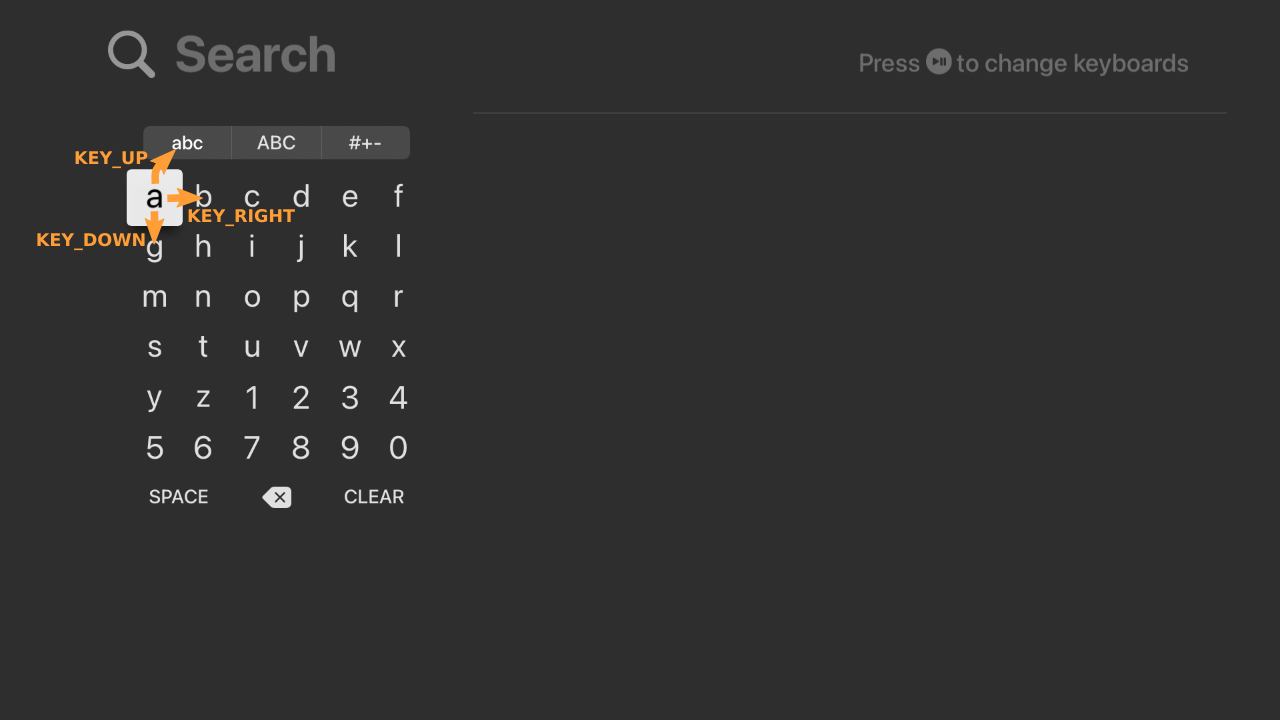
Each edge specifies the button that you need to press on the remote control to
trigger that transition: KEY_RIGHT, KEY_LEFT, KEY_UP, or KEY_DOWN.
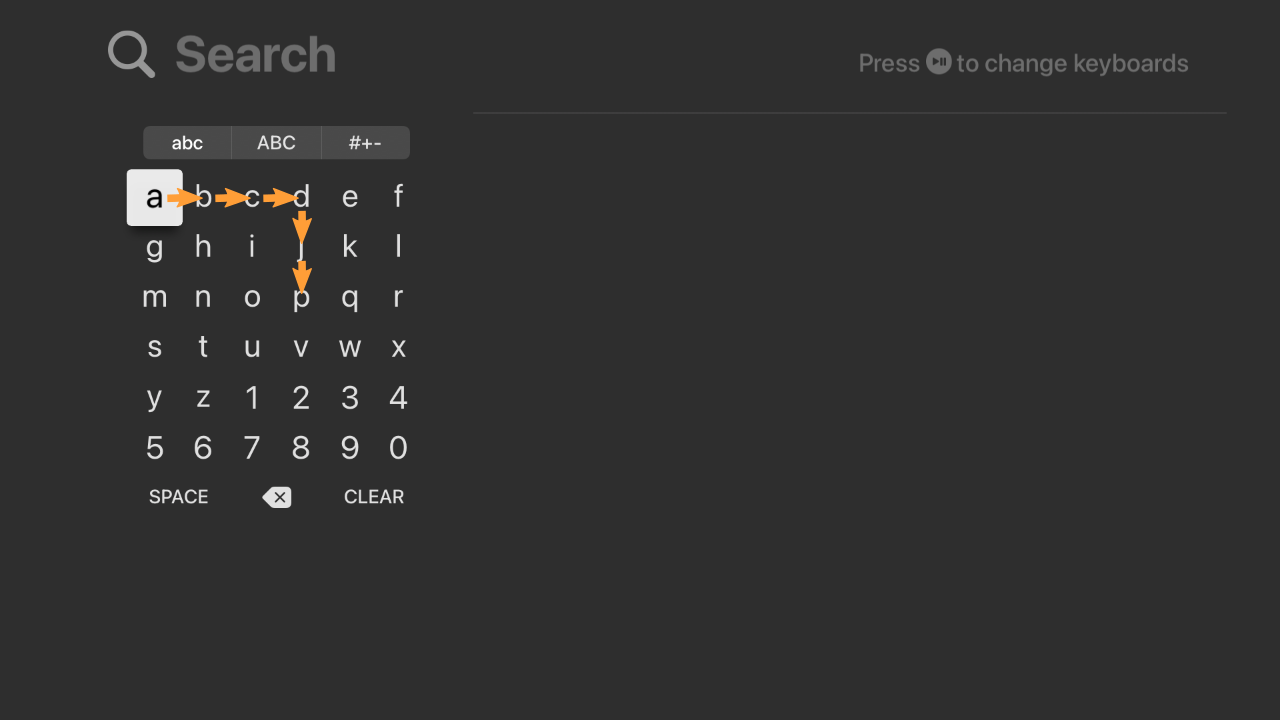
Stb-tester will use this graph to calculate the shortest path to the
target. For example, if the current selection is on “a”, to type the letter “p”
Stb-tester would press KEY_RIGHT 3 times and KEY_DOWN twice (and then
KEY_OK to type the selected letter). Note that there can be more than one
shortest path.
To model this keyboard’s behaviour in our Python code, we can use the stbt.Keyboard API to specify each key’s name and region (its position on the screen; we’ll use this later) using Keyboard.add_key, and the transitions between keys using Keyboard.add_transition, like this:
kb = stbt.Keyboard()
kb.add_key(name="a", region=stbt.Region(x=125, y=175, width=50, height=50))
kb.add_key(name="b", region=stbt.Region(x=175, y=175, width=50, height=50))
kb.add_transition("a", "b", "KEY_DOWN")
# ...and so on for all the other keys...
Hold on, hold on. This keyboard is laid out in a regular grid, so instead of typing each key one by one, let’s use Keyboard.add_grid. Our keyboard has 3 different grids, shown below in different colours:
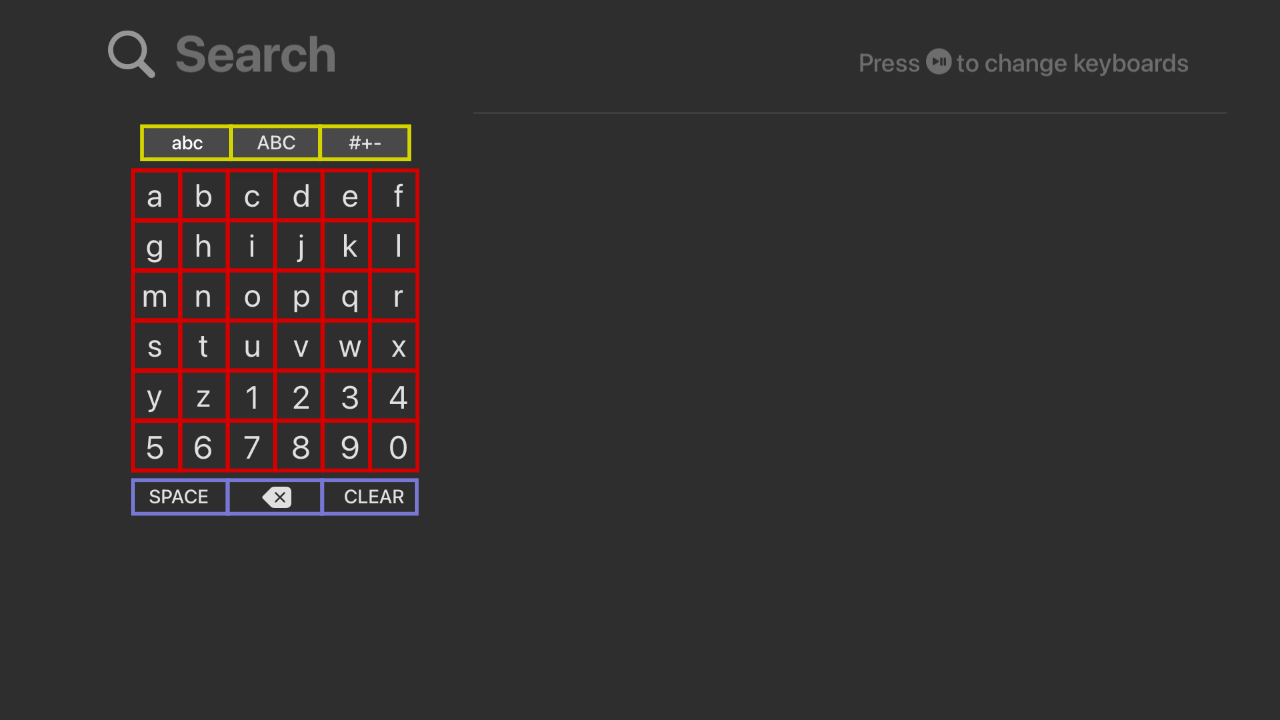
We specify all these keys like this:
kb = stbt.Keyboard()
kb.add_grid(stbt.Grid(region=stbt.Region(x=145, y=125, right=410, bottom=160),
                      data=[["abc", "ABC", "#+-"]]))
kb.add_grid(stbt.Grid(region=stbt.Region(x=125, y=175, right=425, bottom=475),
                      data=["abcdef",
                            "ghijkl",
                            "mnopqr",
                            "stuvwx",
                            "yz1234",
                            "567890"]))
kb.add_grid(stbt.Grid(region=stbt.Region(x=125, y=480, right=425, bottom=520),
                      data=[[" ", "DELETE", "CLEAR"]]))
Much easier, isn’t it! Keyboard.add_grid is only suitable if all the cells in the grid are the same size. You don’t need to be super-precise with the region coordinates — just make sure the centre of each key is inside the right cell.
Note that stbt.Grid’s data parameter is a list of lists. Actually it’s a list of iterables — that’s why we can provide a list of strings because iterating over a string yields one character at a time. We could also have specified it like this:
        data=[
            ["a", "b", "c", "d", "e", "f"],
            ["g", "h", "i", "j", "k", "l"],
            ...etc...
        ]
…but the first way is easier to type and easier to read. For the top and bottom grids we do have to use a list of lists because the key names are longer than a single character.
Keyboard.add_grid will add all the keys and the transitions between them (within the grid). It won’t add transitions that go outside of the grid, so we need to add those explicitly, like this:
# abc ABC #+-
# ↕ ↕ ↕ ↕ ↕ ↕
# a b c d e f
kb.add_transition("a", "abc", "KEY_UP")
kb.add_transition("b", "abc", "KEY_UP")
kb.add_transition("c", "ABC", "KEY_UP")
kb.add_transition("d", "ABC", "KEY_UP")
kb.add_transition("e", "#+-", "KEY_UP")
kb.add_transition("f", "#+-", "KEY_UP")

# 5 6 7 8 9 0
# ↕ ↕ ↕ ↕ ↕ ↕
# SPC DEL CLR
kb.add_transition("5", " ", "KEY_DOWN")
kb.add_transition("6", " ", "KEY_DOWN")
kb.add_transition("7", "DELETE", "KEY_DOWN")
kb.add_transition("8", "DELETE", "KEY_DOWN")
kb.add_transition("9", "CLEAR", "KEY_DOWN")
kb.add_transition("0", "CLEAR", "KEY_DOWN")
Note that, by default, Keyboard.add_transition adds the opposite transition
automatically, for example KEY_UP for KEY_DOWN or KEY_LEFT for
KEY_RIGHT.
You may have noticed that some keys have two possible transitions for the
same remote-control button — for example pressing KEY_UP from “SPACE” can
land on “5” or on “6”. This reflects the keyboard-under-test’s real behaviour:
It remembers which key you came from before navigating down onto “SPACE”, and
it returns to the same column when you go back up. stbt.Keyboard doesn’t keep
track of this state, so we just accept that both of those two keys (“5” and
“6”) are valid targets.
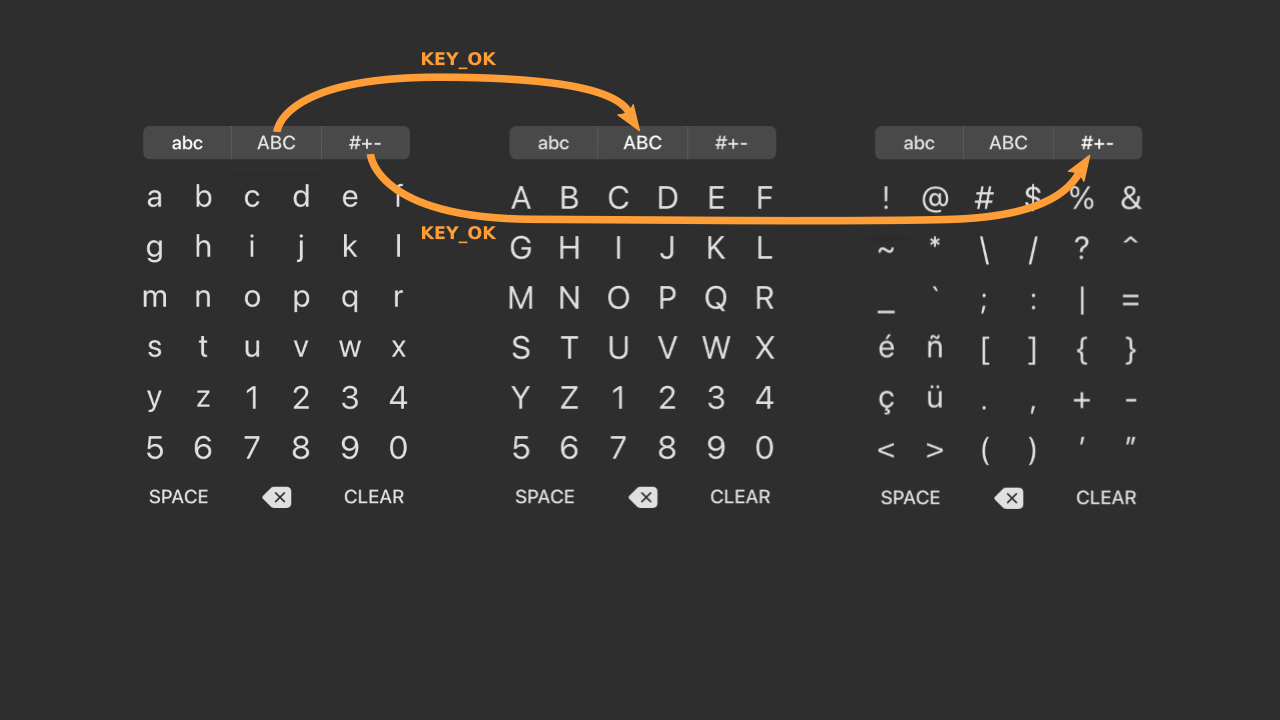
Modes#
This keyboard has three different modes: Lowercase, uppercase, and symbols.
It’s best to think of each mode as an entirely different keyboard, with
transitions that change between them: Pressing KEY_OK on one of the mode keys
(like “ABC”) will go to that mode.
Some keys might appear in more than one mode. It’s important to model these as
different keys — even though they look the same, they are different because
they are connected to different keys. For example there is a “SPACE” key in all
of the modes, but pressing KEY_UP from it will go to a totally different key:
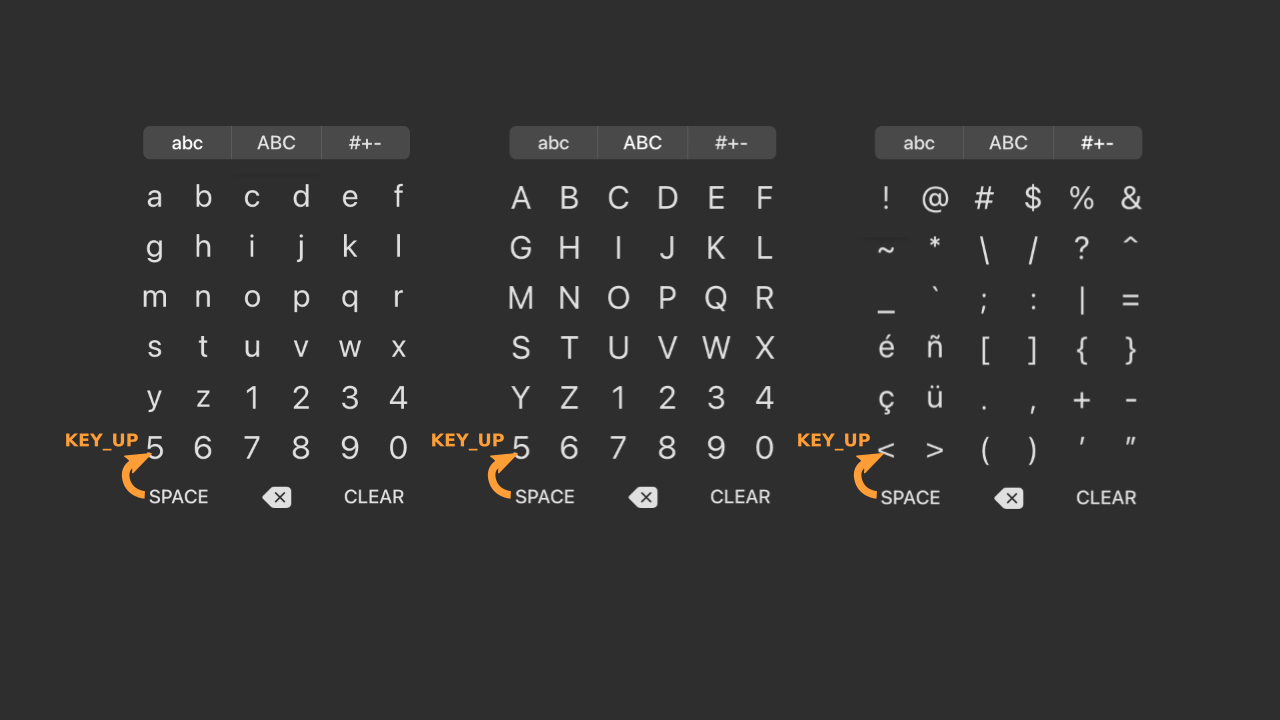
The same is true for the “DELETE” and “CLEAR” keys, the mode keys (“abc”, “ABC”, and “#+-“), and the number keys.
To tell these apart in our model we specify mode when we call Keyboard.add_key, Keyboard.add_transition, or Keyboard.add_grid, like this:
top_grid = stbt.Grid(region=stbt.Region(x=145, y=125, right=410, bottom=160),
                     data=[["abc", "ABC", "#+-"]])
bottom_grid = stbt.Grid(region=stbt.Region(x=125, y=480, right=425, bottom=520),
                        data=[[" ", "DELETE", "CLEAR"]])
middle_region = stbt.Region(x=125, y=175, right=425, bottom=475)
middle_grids = {
    "lowercase": stbt.Grid(region=middle_region,
                           data=["abcdef",
                                 "ghijkl",
                                 "mnopqr",
                                 "stuvwx",
                                 "yz1234",
                                 "567890"]),
    "uppercase": stbt.Grid(region=middle_region,
                           data=["ABCDEF",
                                 "GHIJKL",
                                 "MNOPQR",
                                 "STUVWX",
                                 "YZ1234",
                                 "567890"]),
    "symbols": stbt.Grid(region=middle_region,
                         data=["!@#$%&",
                               "~*\\/?^",
                               "_`;:|=",
                               "éñ[]{}",
                               "çü.,+-",
                               "<>()'\""]),
}

kb = stbt.Keyboard()
for mode in ["lowercase", "uppercase", "symbols"]:
    kb.add_grid(top_grid, mode=mode)
    kb.add_grid(bottom_grid, mode=mode)
    g = middle_grids[mode]
    kb.add_grid(g, mode=mode)

    # Transitions between grids:
    #
    # abc ABC #+-  (top grid)
    # ↕ ↕ ↕ ↕ ↕ ↕
    # a b c d e f  (first row of middle grid)
    kb.add_transition(g[0, 0].data, "abc", "KEY_UP", mode=mode)
    kb.add_transition(g[1, 0].data, "abc", "KEY_UP", mode=mode)
    kb.add_transition(g[2, 0].data, "ABC", "KEY_UP", mode=mode)
    kb.add_transition(g[3, 0].data, "ABC", "KEY_UP", mode=mode)
    kb.add_transition(g[4, 0].data, "#+-", "KEY_UP", mode=mode)
    kb.add_transition(g[5, 0].data, "#+-", "KEY_UP", mode=mode)

    # 5 6 7 8 9 0  (last row of middle grid)
    # ↕ ↕ ↕ ↕ ↕ ↕
    # SPC DEL CLR  (bottom grid)
    kb.add_transition(g[0, 5].data, " ", "KEY_DOWN", mode=mode)
    kb.add_transition(g[1, 5].data, " ", "KEY_DOWN", mode=mode)
    kb.add_transition(g[2, 5].data, "DELETE", "KEY_DOWN", mode=mode)
    kb.add_transition(g[3, 5].data, "DELETE", "KEY_DOWN", mode=mode)
    kb.add_transition(g[4, 5].data, "CLEAR", "KEY_DOWN", mode=mode)
    kb.add_transition(g[5, 5].data, "CLEAR", "KEY_DOWN", mode=mode)
Now we just need to add the transitions between modes: If we’re in lowercase
mode with the selection on “ABC”, pressing KEY_OK takes us to uppercase mode
with the selection still on “ABC” (see Figure 4) — and so on for the other
mode keys:
for source_mode in ["lowercase", "uppercase", "symbols"]:
    for name, target_mode in [("abc", "lowercase"),
                              ("ABC", "uppercase"),
                              ("#+-", "symbols")]:
        kb.add_transition(kb.find_key(name=name, mode=source_mode),
                          kb.find_key(name=name, mode=target_mode),
                          "KEY_OK")
Note that in this keyboard we can identify a key unambiguously by its name + mode. Some keyboards might have the same key twice in two different places in the same mode (for example two “shift” keys) — in that case you would model this as two separate keys with the same name & mode, but different region.
This keyboard has another way of changing modes: Pressing KEY_PLAY cycles
through the modes. For example from “a” to “A” to “!” and back to “a”; or from
“b” to “B” to “@”, etc.
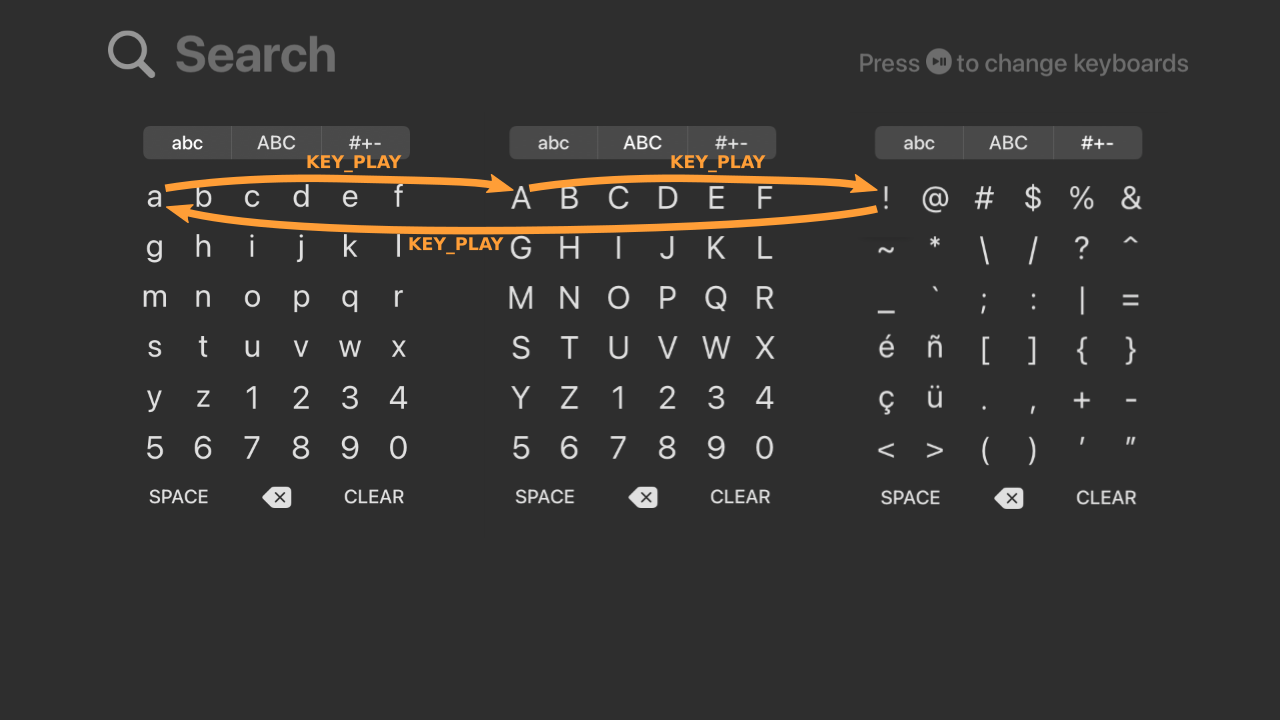
KEY_PLAY.
To model this we need to add each a transition from each and every key in the keyboard. We can use Keyboard.find_keys to loop over the keys we have already added to the model, and Keyboard.find_key (singular) to find the corresponding target for each transition, like this:
for source_mode, target_mode in [("lowercase", "uppercase"),
                                 ("uppercase", "symbols"),
                                 ("symbols", "lowercase")]:
    for key in kb.find_keys(mode=source_mode):
        target = kb.find_key(region=key.region, mode=target_mode)
        kb.add_transition(key, target, "KEY_PLAY")
Identifying the currently selected key#
We have modelled the keyboard’s behaviour. Now, to use that model we need to understand the current state of the device under test: Which key is currently selected?
With Stb-tester, the way we extract this information from the screen is to write a Page Object (a Python class) that does the necessary image-processing. Our Page Object class will have two properties:
is_visible: Returns True if the keyboard is visible and focused.selection: Returns the currently selected key.
We can answer both of these questions (Is the keyboard visible? And which key is selected?) with stbt.find_selection_from_background. Let’s start with a simple example that only understands the lowercase keyboard:
class Search(stbt.FrameObject):
    """The YouTube search keyboard on Apple TV."""

    @property
    def is_visible(self):
        return bool(self.selection)

    @property
    def selection(self):
        match = stbt.find_selection_from_background(
            "lowercase-background.png",
            max_size=(115, 70),
            frame=self._frame,
            mask=stbt.Region(x=125, y=125, right=425, bottom=520))
        if match:
            return kb.find_key(region=match.region, mode="lowercase")
        else:
            return None
stbt.find_selection_from_background compares the video frame (captured from
the device under test) against the specified reference image
(“lowercase-background.png”). This reference image is a screenshot of the
keyboard without any selection. Thus, any differences between the frame
(which does show a white rectangle around the selected key) and the reference
image are going to tell us where the selection is. If the differences span a
larger region than the size of the biggest key (max_size above), then it
means that we’re looking at a different screen — not the keyboard.
You may need to create this selection-less image by merging two different screenshots together. This video shows how to do it in the GNU Image Manipulation Program, a free open-source cross-platform image editor:
Step by step instructions:
Open both screenshots. They must have the selection on different, non-overlapping keys.
Drag one of the open image tabs onto the other tab and drop it into the Layers window so that it’s above the existing layer.
Use the rectangle selection tool to select the part of the image that contains the selection.
Choose Edit > Clear (or press Delete on your keyboard). The layer underneath will show through the deleted region, showing the same key but without the white rectangle.
Use File > Export As… to save the image in PNG format to your test-pack.
Don’t forget to commit the image to git! (Until you do, your IDE will show a lint error underneath the filename to remind you.)
Now, to recognize all three modes, we need to create similar (selection-less)
reference images for the other modes: “uppercase-background.png” and
“symbols-background.png”. Finally, we update our Search.selection property
so that it looks like this:
    @property
    def selection(self):
        for mode in ["lowercase", "uppercase", "symbols"]:
            match = stbt.find_selection_from_background(
                mode + "-background.png",
                max_size=(115, 70),
                frame=self._frame,
                mask=stbt.Region(x=125, y=125, right=425, bottom=520))
            if match:
                return kb.find_key(region=match.region, mode=mode)

        return None
Tip: Debugging your Page Object#
You can visualise & debug your Page Object’s properties in the Object Repository tab of your Stb-tester Portal:
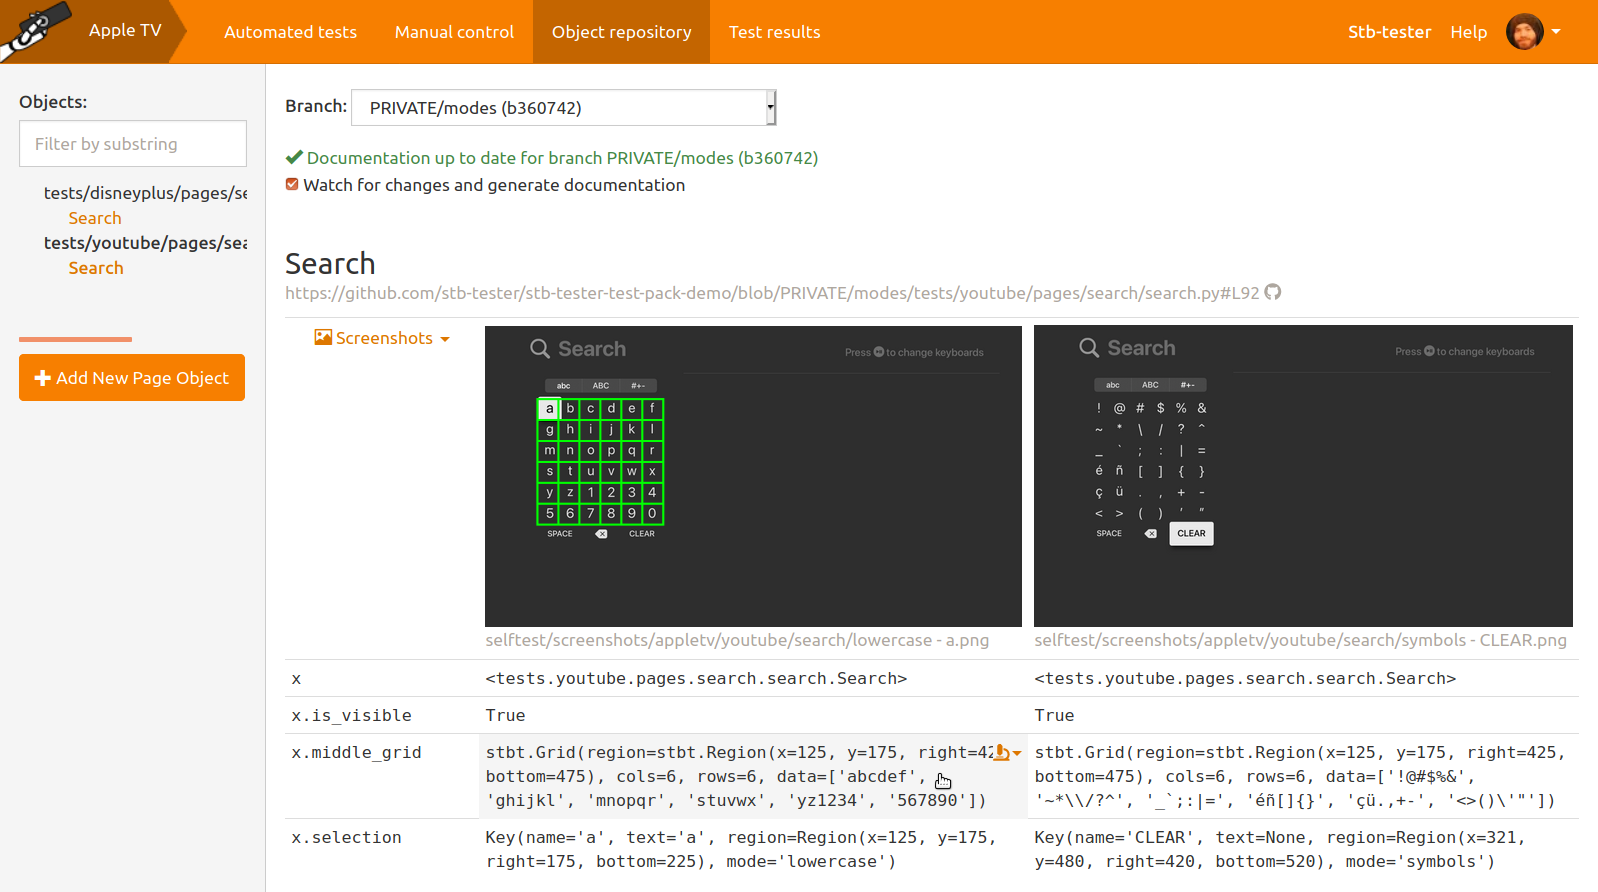
To learn more about Page Objects see Object Repository in the Stb-tester manual, and the stbt.FrameObject API reference documentation.
Common mistake: Using an outdated page instance#
Keyboard.enter_text and Keyboard.navigate_to take a Page Object instance in
their page parameter. This instance has a selection property that reflects
the position of the selection at the time the instance was created. If this
instance is out of date (because the selection has moved since that time), then
stbt.Keyboard will calculate a path from the wrong start position to your
target node.
This is because Stb-tester’s Page Objects are immutable: An instance of the Page Object reflects the state of the device-under-test at the time the instance was created.
The following code won’t work:
# EXAMPLE OF BAD CODE -- DON'T COPY
def enter_text(self, text):
kb.enter_text(text, page=self)
kb.navigate_to("SEARCH", page=self) # <-- self.selection is outdated!
stbt.press_and_wait("KEY_OK")
To get the latest state, you can create a new instance of the Page Object like this:
page = Search()
Or like this:
page = self.refresh()
(where self is an instance of our Search Page Object.)
For this purpose, Keyboard.enter_text and Keyboard.navigate_to
return a new page instance that reflects the state of the device-under-test
after the text has been entered (or the navigation completed). We can use
their return value instead of calling self.refresh(). Here’s the corrected
example:
# FIXED EXAMPLE
    def enter_text(self, text):
        page = self
        page = kb.enter_text(text, page)
        page = kb.navigate_to("SEARCH", page)
        stbt.press_and_wait("KEY_OK")
        return page.refresh()
Note that we have made our method return an updated page instance. This is
consistent with Keyboard.enter_text’s behaviour, and it allows any testcases
that call our enter_text method to use the same pattern.
Simple keyboards (no modes)#
Many on-screen keyboards don’t have modes — there’s just a single uppercase or lowercase keyboard. Or maybe your keyboard does have several modes, but you don’t care to test them — you just want your test script to type in a search term, and the case doesn’t matter. (Typically the different modes are only really necessary for login keyboards where you type a password.)
In this case, you don’t need to specify mode when you call
Keyboard.add_key, Keyboard.add_grid, or Keyboard.add_transition. The
key’s name alone, or the name + region, will be enough to identify a key
unambiguously. You will need to make your enter_text method convert to
lowercase or uppercase, as appropriate, like this:
class Search(stbt.FrameObject):
    ...

    def enter_text(self, text):
        return kb.enter_text(text.lower(), page=self)
Shift modes#
If your keyboard has a “shift” mode, where pressing KEY_OK on an uppercase
letter types the letter and changes to the lowercase mode, you can model
this by specifying a transition from every key in the uppercase mode, to the
same key (by region) in the lowercase mode. The code would look somewhat
similar to the example earlier in this article for
changing modes by pressing KEY_PLAY.
See the full code from this tutorial here.